Your Source for Comprehensive A/R Benchmarking!
After signing up, please follow the steps below to submit your company demographic info & monthly A/R data, set your data analysis priorities, and then compare your company's data to other companies.
All data you submit is ANONYMOUS, and no company identifying info is collected or used.
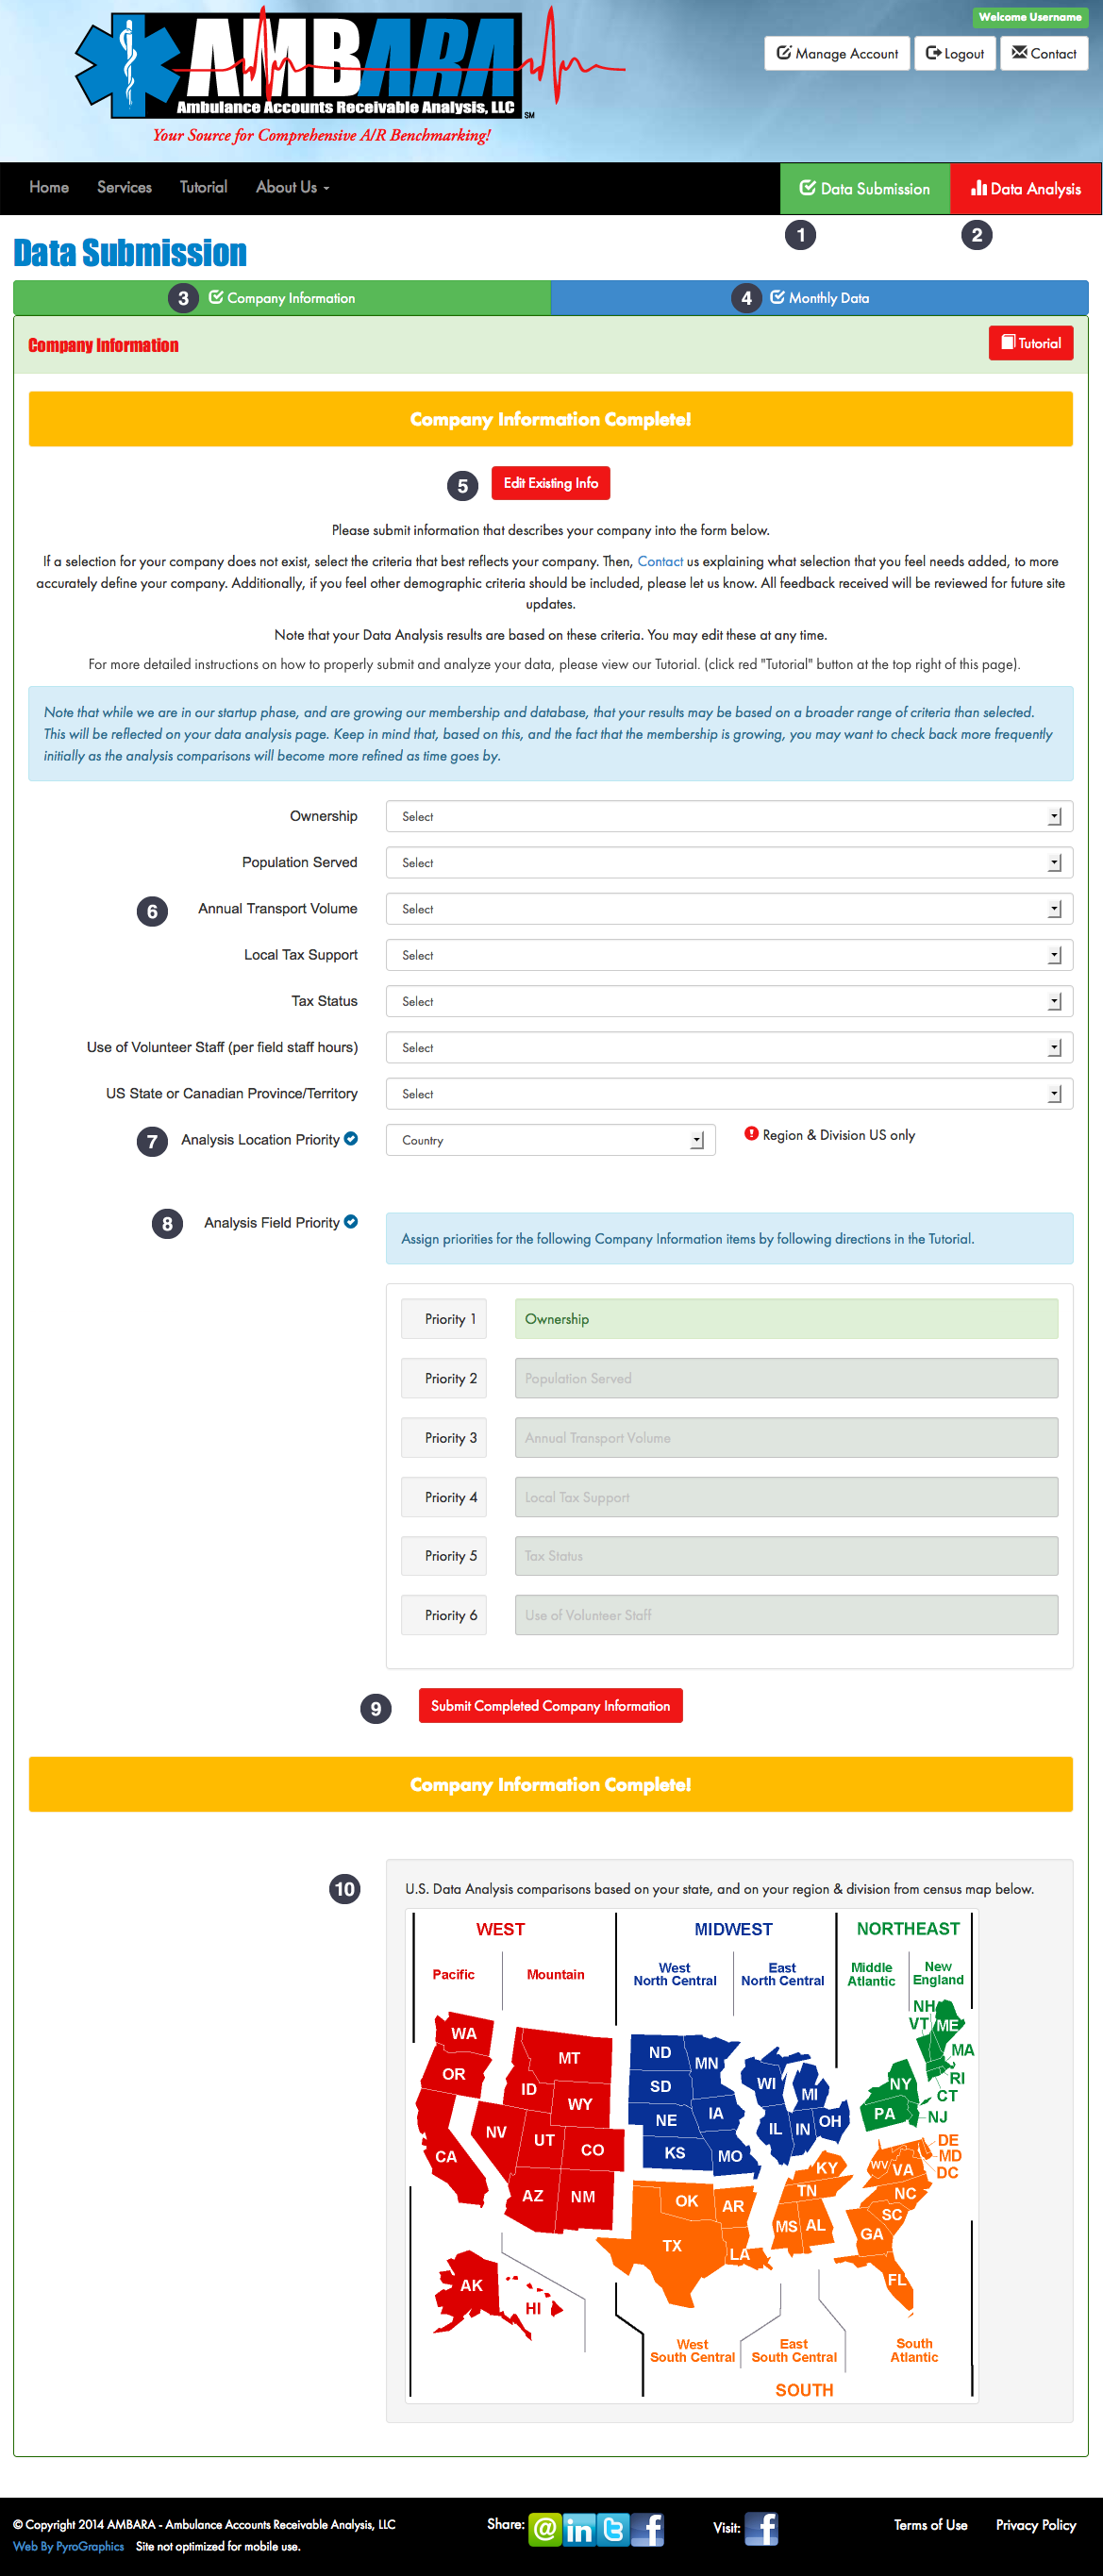
Upon successfully logging in or signing up, you will be taken to the Data Submission-Company Information Page. This page can also be accessed via the Data Submission menu item 1. The Data Submission area is comprised of two pages: Company Information and Monthly Data. You will initially land on the Company Information page below, upon entering the Data Submission area. Once you have completed your Company Information, subsequent visits to the Data Submission area will take you to the Monthly Data page. Once in the Data Submission area, you can navigate between the two areas via buttons 3 & 4.
The two priority assignment steps below, determine how the database conducts it's search for similar companies ("Similar Members" on the Data Analysis page 16) for you to compare to.
Step 2) Analysis Location Priority. Select your Analysis Location Priority from the drop-down menu 7. This selection determines the geographic area that your data analysis results will be drawn. This is default to "Country", which will give you the broadest range of results. U.S. members may refine (narrow) their results by selecting Region, Division, or State. Canada members by selecting Province/Territory. Note that State/Province/Territory are combined to one selection, and the database views each of these as a "state". Therefore, occasionally you will see the word "state", which actually reflects all 3.
Step 3) Analysis Field Priority. For each of the top six company information items, you will need to select the "Analysis Field Priority" (priority 1 thru 6) you would like to assign to each, 8. These selections determine how your data analysis results will be drawn. This is default to "Ownership" for priority 1 (in green), and all other priorities not assigned (in gray). Example 1 below is based on this default selection. You must assign at least one of the six items to priority 1, however assigning priorities 2 thru 6 is optional. The more you assign, the narrower your results.
Assigned priorities means the database search will only include members with the same selection as you for that item, excluding the others. Priorities not assigned, means the database search will include all selections for that item.
The database will first find all members in the geographic area you have selected, based on your Analysis Location Priority selection (Step 2). Then, based on this step, it will find all members within that geographic area based on your Analysis Field Priority assignment for priority 1. Then it will find all members within that subset, based on your assignment for priority 2, and so forth, refining and narrowing your results with each successive assigned priority. See Example 2 below. The database will always search the Analysis Location Priority, and Analysis Field Priority assignment for priority 1. As long as there are results (at least one member) found in the subsequent priority (2-6) searches, if assigned, the database will search for matches to the next priority selection. When it encounters a priority search that has no results, it will stop it's search. So, for example, if it finds ten members in it's priority 3 search, it will conduct a priority 4 search. If no members are found, it will not conduct a priority 5 or 6 search. You can see what priority assignments yielded results on the Data Analysis page at 15. (see Step 9 below). In this example, it would display your Analysis Location Priority, and Analysis Field Priority assignments for priority 1, 2, & 3. You can use this information to refine/revise your priorities, if you like. In this case, you might return here and change your priority 4 assignment, and possibly priorities 5 & 6, as well.
To assign priorities, please follow the following steps:
When you have completed Steps 1-3, click the red "Submit Completed Company Information" button 9. If the form is complete, it will be submitted, and orange " Company Information Complete!" messages will be displayed.
To Edit Company Information. First access the Company Information page.
To edit the data, click the red "Edit Existing Info" button 5. The form is now ready for editing. Edit any values you would like to change: highlight the existing value with your cursor, and enter your new value. When you have completed your edits, click the red "Submit Completed Company Information" button 9. If the form is complete, it will be submitted, and orange "Company Information Complete!" messages will be displayed.
You may then proceed to the Monthly Data page.
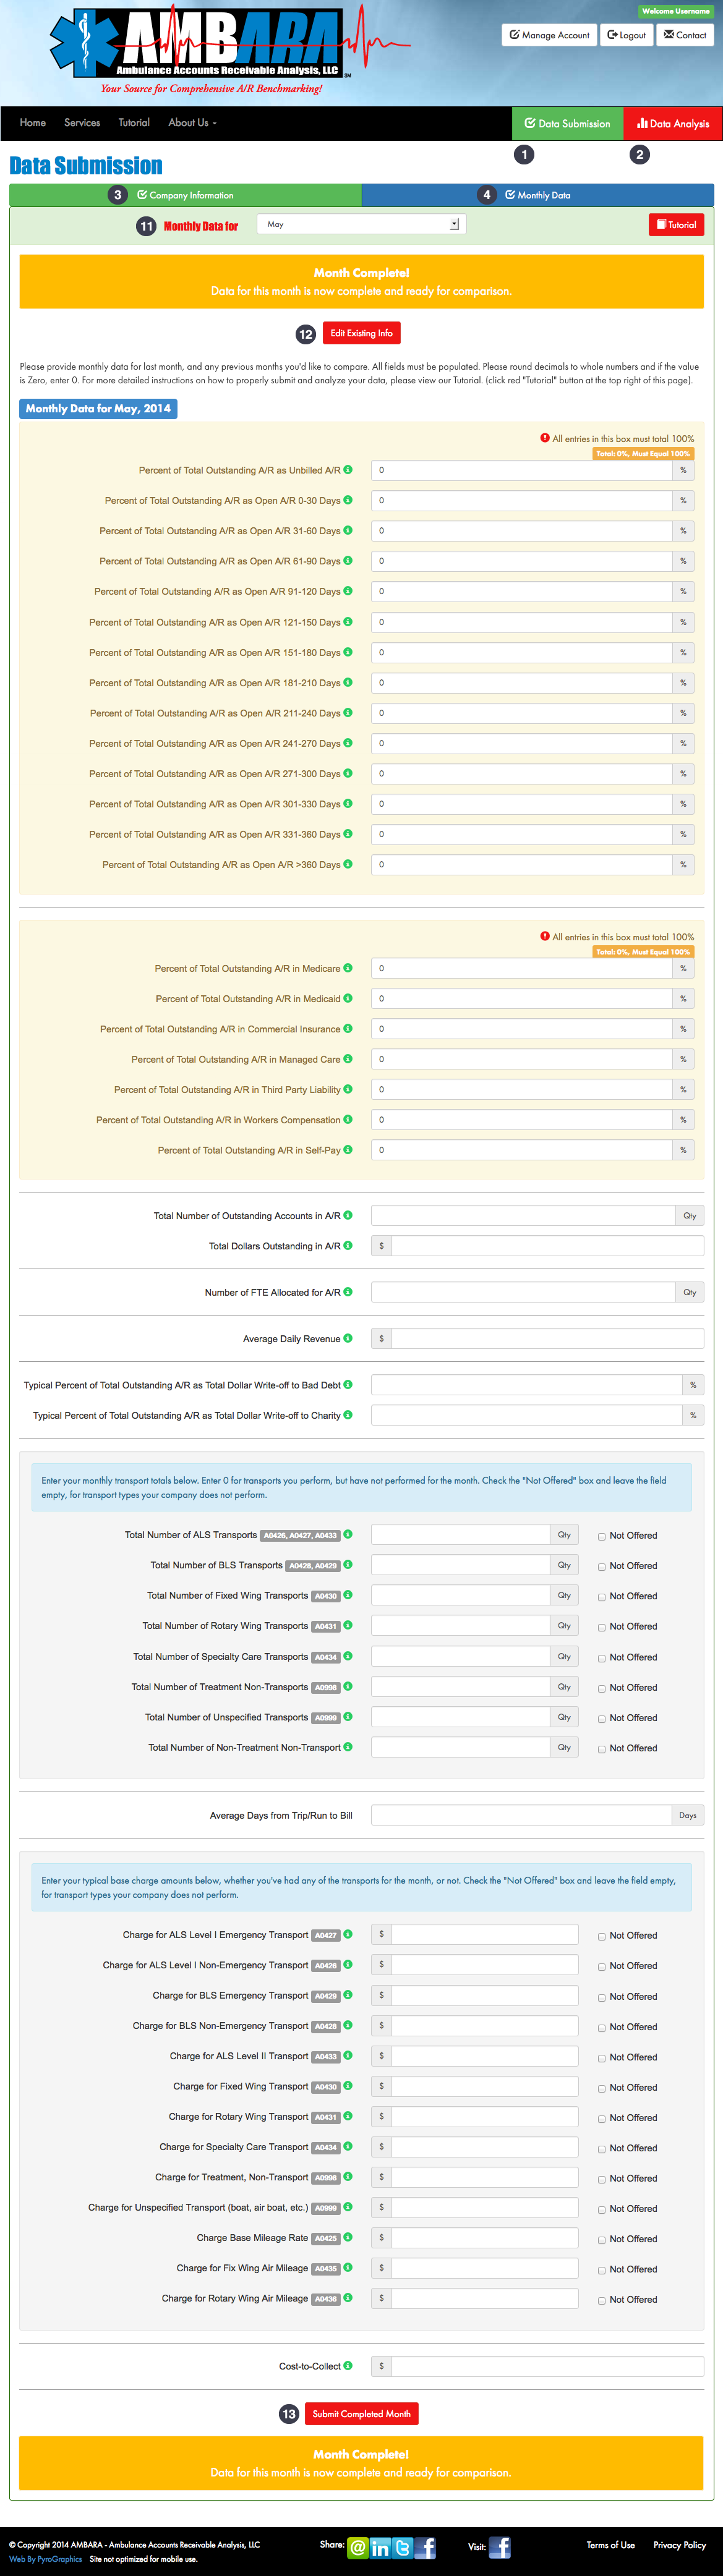
Step 4) Access Monthly Data Page. The Monthly Data page is accessed via the Monthly Data button 4.
Upon first arrival on the Monthly Data page, the selected "Monthly Data for" month, will be the last full month that is available for data submission. It is the month previous to the month it currently is. For example, if you are in June, the last full month would be May. Subsequent arrivals to this page, will have the month selected that you were at on your last visit here.
Step 5) Select Month. From the "Monthly Data for" drop-down menu 11, select the month for which you wish to submit data.
For new members, you should submit data for the last full month, which is already selected for you. Or, the most recent month that you have data available for.
Step 6) Monthly Data Entry. Fill in the form with your company's data for the month selected. All fields must be populated. Please round decimals to whole numbers and if the value is Zero, enter 0.
Fill in the fields with the quantity, percentage, or dollar amount as requested. No percentage or dollar signs are required, just the value.
To change the value in a field with an existing value (whether a default zero, as some fields have, or to change a value that was entered incorrectly), highlight the existing value with your cursor, and enter your new value. (backspacing will not work in most fields due to persistent default values, etc.).
The top two "Percent of Total Outstanding A/R" areas, should each total 100%. As you fill these in, counters display your progress. These areas are not considered complete until they each total 100%.
The two transport total and base charge areas include checkbox selections for "Not Offered". Check the box and leave the field empty, for transport types your company does not perform. (these selections, and base charge values, should be the same every month, unless your company services or billing change).
When you have completed Steps 4-6, click the red "Submit Completed Month" button 13. If the form is complete, it will be submitted, and orange "Month Complete!" messages will be displayed.
To Edit Monthly Data. Access the Monthly Data page, then select the previously completed month that you would like to edit.
To edit the data, click the red "Edit Existing Info" button 12. The form is now ready to edit. Edit any values you would like to change: highlight the existing value with your cursor, and enter your new value. When you have completed your edits, click the red "Submit Completed Month" button 13. If the form is complete, it will be submitted, and orange "Month Complete!" messages will be displayed.
You may then proceed to the Data Analysis page.
Step 7) Access Data Analysis Page. The Data Analysis page is accessed via the Data Analysis menu item 2.
Upon first arrival on the Data Analysis page, the selected "Select Month for Comparison" month, will be the month prior to your most recent completed month 14, and will be displayed to the right of the drop-down menu. Subsequent arrivals to this page, will have the month (or yearly average - Coming soon!) selected that you were at on your last visit here. Per the example in Step 5 above, this would be February 2014.
The top row of your results, for each A/R data field 17, for example, will always be based on your most recent completed month. This is current data; how your company and other companies are doing now.
(Per the example in Step 5 above, this would be March 2014.)
The bottom row of your results, for each A/R data field 18, for example, will be based on the "Select Month for Comparison" 14 selection. This is historical data; how your company and other companies were doing during the selected time frame.
(Per the example in Step 5 above, this would initially be February 2014.)
This selection can be changed anytime, per Step 8 below.
Step 8) Select Month. From the "Select Month for Comparison" drop-down menu 14, select the month, or yearly average, for which you wish to compare data. This selection will now be displayed in the bottom row of your results, for each A/R data field.
The drop-down includes information on the Monthly Data submission status, for each available month. Months will be identified as "Partially Completed" or "Completed". Months with neither of those identifiers, have not been started being filled in.
You can now view and compare your most recent completed month's data...
To the same month's data for other members, in the top row for each field 17,
And
To your historical data and the historical data for other members, in the bottom row for each field 18, based on your selection 14.
Step 9) Read & Compare Data. The six columns 16, (four for Canadian members), display the following data for each A/R data field, for the time frame for the two rows, 17 & 18, detailed above:
Member - This is your company's data.
Similar Members - This is the data averages for all companies that are similar to your company (your company is not included in these averages), based on your submitted Company Information in Step 1, and the priority selections in Steps 2 & 3. See those steps for information on how the database uses these priorities to conduct it's searches. These priorities are displayed at 15 for reference.
The following data are averages of all companies' data based on your location. (from left to right, to the right of Similar Members) - Country, Region, Division, State/Province/Territory. Here you can compare to other companies in these different locations. How do you compare to other companies in your state? Nationwide? Etc. (Note than Canadian members will have empty fields for Region & Division.)
Step 10) Printing & Downloading. The Print 19 and Download Spreadsheet 20 buttons allow you to print the data results you are viewing, or a spreadsheet of data can be downloaded with the current data results.